ECO MASTER 4. Set Up
4.1 Set up Changer Unit and Power Supply

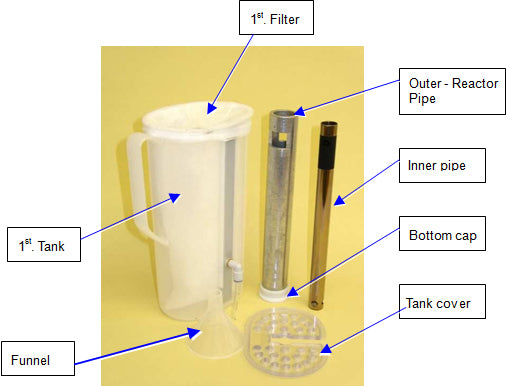
4.2 Set up Water Recycle System
1) Place the “1st. filter into the 1st. tank. Fold it over the edge.
2) Assembled 1st. Tank


We recommend using DISTILLED water to get the best finishing quality


4.3 Preparation for Operation
4.3.1 Setting spindle
4.3.2 Turning on the power


4.3.3 Preparation of Water and Compound


Contents.
- 1. Safety Precautions
- 1.1 Explanation
- 1.2 Table of Illustrated Symbols
- 1.3 Fundamental Matters of “WARNING!” and “CAUTION!”
- 1.4 Requirements for Installation
- 2. Contents of packing
- 3. Description and Function of Each Part
- 3.1 Main Body
- 3.2 Operation Part
- 3.3 Abrasive Unit
- 3.4 Loading Unit
- 3.5 Platen Unit
- 3.7 Pump and Water Recycle Unit
- 3.8 Pad Holders
- 4. Set Up
- 4.1 Set up Changer Unit and Power Supply
- 4.2 Set up Water Recycle System
- 4.3 Preparation for Operation
- 4.3.1 Setting spindle
- 4.3.2 Turning on the power
- 4.3.3 Preparation of Water and Compound
- MAIN DISPLAY
- 5. Operation
- 5.1. Power on
- 5.2. Power off
- 5.3. Initialization
- 5.4. Select Menu - Repairing Discs
- 5.4.2 Sanding (For very deep scratch removal on CD’s only)
- 5.5 During operations
- 5.6 During a pause
- 5.7 Check(Brings up many displays of statistics and parameters.)
- 5.7.1 Running total
- 5.7.2 Warning
- 5.7.3 Repair history
- 5.8 Error Messages
- 5.9 Error List
- 6. Maintenance
- 6.1 Supplement Compound
- 6.2 Supplement Water
- 6.3 Daily maintenance
- 6.4 Weekly maintenance
- 7. Caution
- 8. Service
- 9. Specifications
- 10. Wiring Diagram
- 11. Replacement Parts
