ECO AUTOSMART 1. How to install
1.1 Contents in package:
|
Main Unit (1 unit)  |
Pad Holders (4 pieces)  |
|
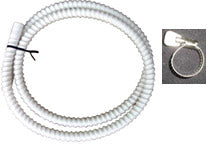
Drain Hose & Hose Clamp (1 of each) Hose clamp (1 piece)  |
Compound bottle and Holder (1 of each)  |
|
Power Cord (1 cord)  |
1.2 Location for Installation:
Carefully unpack your machine from the shipping carton and place on a secure flat surface.Install in a location where you have full access to the machine and the front door can open fully, such as a counter top or flat top cart.
| Carefully carry the machine. Contact a representative @ ELM USA if the machine has been dropped. If the machine is misused, fire or electric shock may occur. |
|
|
|
| Choose wisely what you put near machine. There is the possibility of water leakage if machine is not set up properly. | |
1.3 Moving the machine:
|
|
| Remove Pad Holders and close the Front Door when you need to move the machine. |
Front Door may not open due to Pad Holder(s) dropping inside the machine and may cause an error. If the Front Door does not open, do not open it forcefully and do not disassemble machine. Please see P. 23 on how to manually open the front door. |
1.4 Sending back the machine to ELM USA:
If your machine needs to be sent back to ELM USA it must be sent back in the original box and packing to avoid damage to the machine during shipping. ELM USA is not responsible for any shipping damage to machine.*IMPORTANT: Keep the shipping carton and packing material for machine*
Contents.
- 1. How to install
- 1.1 Contents in package
- 1.2 Location for Installation
- 1.3 Moving the machine
- 1.4 Sending back the machine to ELM USA
- 2. Description and Function of each part
- 3. LED Display
- 4. Pad and ST (Repair process) number
- 5. How to use
- 5.1 Set-up
- 5.2 Power on and off
- 5.3 How to operate Water and Compound Pumps
- 5.3.1How to switch between CD/DVD and Blu-ray repair modes
- 5.4 Setting a disc for repair
- 5.5 Operations for repairing disc
- 5.5.1 Explanation of repair mode
- 5.5.2 How to start a repair
- 5.5.3 Understanding displays on LEDs when machine is repairing a disc
- 5.5.4 Pausing the repair process
- 5.5.5 Process completion
- 5.5.6 Consumable replacement alerts
- 6. Alert List
- 7. Error occurrence
- 7.1 Error code
- 7.2 Error reset
- 7.3 Error List
- 7.4 Manually opening the Front Door
- 8. Daily maintenance
- 8.1 Daily cleaning
- 8.2 Daily inspection
- 9. Servicing machine
- 10. Specifications
- 11. Wiring Diagram
- 12. Maintenance Parts
